PERMANENT HOG TRAPS - Detailed Plans
See a YouTube video explaining
the door and trigger.Materials Needed:
3 cattle pen panels: These are 16' x 52"
9 fence posts: 8 feet in length
Four -- 2" x 6" x 12' pressure treated boards
Three -- 2" x 4" x 12' pressure treated boards
One -- sheet of 1/2" plywood (this will make two doors)
Large staples (for nailing the panels to the posts)
Four -- Bolts at least 12" in length (for attaching the door to the posts) If your hardware store doesn't have a "bolt" this long, as for "all threads."
Nails (3" long, for nailing together 2" boards)
20 feet of cord (clothesline cord works great)
Materials Cost: Cattle panels are about $20 each. The posts are about $7 each. Including the plywood and pressure treated lumber, you can build this trap for about $175.Tools needed:
Post hole diggers
shovel
packing stick (for packing the dirt around each post) (you may wish to use quickrete)
hack saw
drill & long bit
hammer
circular saw (wood saw)
square (must get the door frame square so door will slide correctly)
Time: With two people working, it took us 45 minutes to complete the door and 3 hours to put together the remainder of the trap.Directions:
(The letters in red correspond to the pictures.)
A couple of sawhorses will make this task easier. You can build this door at home or at your shop, then transport it to the location of the trap.Making the door frame....
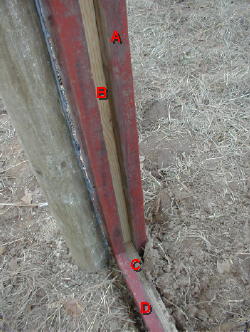
Cut the four 2"x6"x12' boards into lengths of 99 inches. Cut the two 2"x4"x12' boards into lengths of 95". (You will use the remaining sections of the boards elsewhere). Nail together the 2x6s [A], sandwiching the 2x4 [B] in the middle for the groove for the door to slide. The top end of the interior 2x4 should be flush with the top ends of the 2x6s.Next, on the bottom end of the door frame insert a 2" x 4" x 42" board between the 2x6s [C]. This will form a "stop" for the door to land on when it falls. Use one nail on each side until you complete the next step, then add a few more.
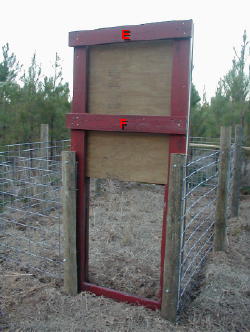
On the top of the door frame, use a 2'x6'x42" board for the upper brace [E]. At this point you need to make sure the door frame is square, before you completely nail this board and the board mentioned in the step above [C]. Once you are sure it is square, use several nails on each side.
About 2½ feet below the upper cross board [E], nail another 2x6 brace for support. [F]
Cut another 2x6 to 32" in length. Nail this board to the 2x4 on the bottom of the trap to form a lip that will support the lower end of the door once the door falls. [D]
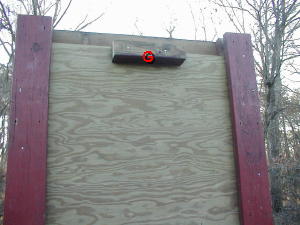
Cut the door from the sheet of plywood. The door should be 4' tall by 35½" wide. (The groove in which the door slides is 36" wide.) Nail a 2"x4"x12" board (or two) to the upper side of the door [G].
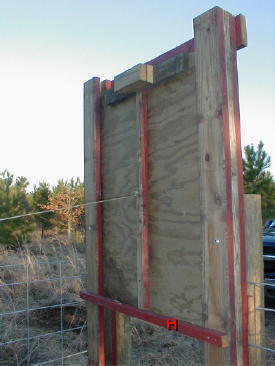
Flip over the door frame so that the side that will be on the inside of the trap will now face upward. Insert the door, sliding it in from the top of the door frame.Next, you will attach one more board (2" x 2" x 42") [H] cross ways on the door frame for the trigger rods to rest on. Move the door to the "closed" position and nail this board just below the block on the door frame, so that the board does not interfere with the falling of the door.
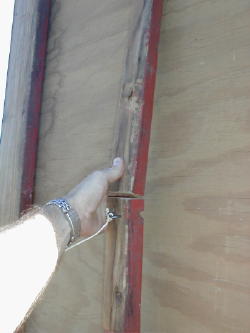
Lastly, cut a 2"x2" board to a length of 45", then cut it in half. These are the trigger rods. Attach a fence staple to the upper end of the lower rod. This is where you will attach the string that will run to the trigger itself, as shown in the picture below.
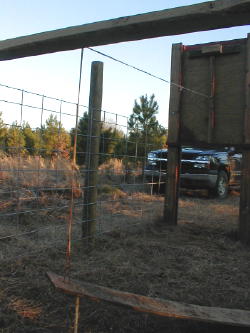
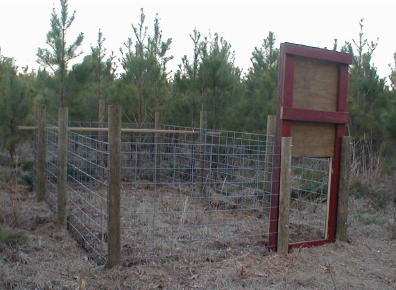
With the door built, now you will lay out the dimensions of the trap, set the posts, and then nail the panels to the posts. Our traps are 16' by 8'. We sunk our posts 3 feet in the ground to make them as sturdy as possible. Make sure to pack them tightly. Pay special attention to the posts that the door will be attached to so that they will be the correct distance apart to allow the easy attachment of the door. We dug a trench about 3 inches deep to slightly sink the panels in the ground to discourage a hog from rooting under the panel.
With the pen completed constructed, now all you have to do is attach the door to the posts using the large bolts.
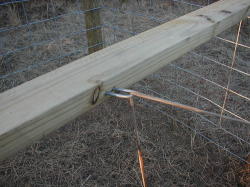
The above picture shows the trigger. A 2x4 is run through the hog panels. A fence staple is nailed to this board so that the cord can run through it and straight down to the board that is angled up from the ground. This board is supported by a small stick in the ground. Place the corn around and on top of this board. When the hog knocks the board off the stick by rooting under it or by stepping on the board, the trigger rods are pulled forward and the door falls.
Once you catch a hog(s), I would suggest that you shoot the hog from a comfortable distance. The closer you get, the more rambunctious they are going to get and the greater the potential that they could damage the trap. If pushed, a large hog could go over the side of the trap walls.
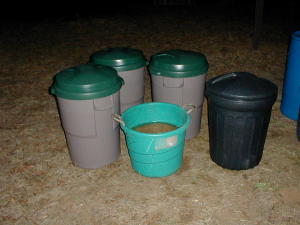
I have several trash cans that I fill with corn and water and allow to sit for several weeks. The corn sours, making it easier for the hogs to smell. This also discourages the deer from eating it.
If you have any questions whatsoever, please email me at hornswamp@yahoo.com and I will be glad to assist.
Good luck! Hope you catch a bunch of hogs.